Using a Vacuum Mixer to Prepare Clear Epoxy Resin for Casting
Demonstration Notes
Introduction
In this demonstration, we will use a vacuum mixer to prepare clear epoxy resin and cast it in silicone molds to create various shapes and objects. The vacuum mixer is effective for mixing a wide range of materials in a container that is free of air. It operates under low pressure and uses planetary motion to thoroughly mix the materials, resulting in shorter processing times and increased productivity. By mixing in a vacuum environment, we can prevent the formation of bubbles and achieve more consistent results by avoiding unwanted secondary reactions with atmospheric gases. The vacuum mixer also simplifies the mixing process by reducing the number of steps and shortening the operation time.
Hardware
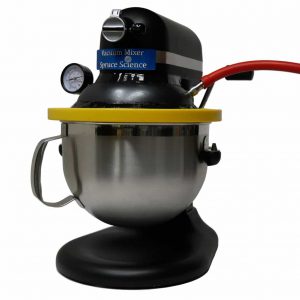
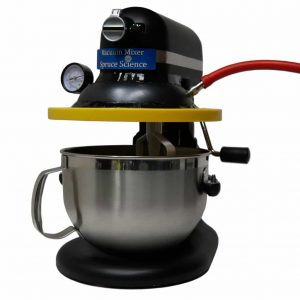
This vacuum mixer is a complete, integrated system that includes everything necessary to mix materials in a low pressure vacuum environment. It consists of a vacuum mixer, pump, hose, and valve assembly, and is equipped with a powerful motor that can handle a wide range of viscosities. The mixing bowl is made of stainless steel and has a capacity of 6 quarts. The mixing speed is adjustable and the mixer uses planetary motion for thorough mixing. The vacuum pump removes air molecules from the mixing bowl, and an analog gauge is included for monitoring the vacuum level. This equipment is designed to operate on a standard electrical supply of 120 V AC, 60 Hz.
Samples
In this resin casting demonstration, we will be using three different samples: a deep blue flower, a pine cone, and children’s toys. The deep blue flower is a California Lilac, also known as a Ceanothus, which is a beautiful perennial evergreen plant known for its drought tolerance. The pine cone and children’s toys will also be cast in clear epoxy resin using silicone molds. Now that we have introduced the samples, let’s move on to preparing the epoxy resin.
Epoxy Preparation
To prepare the epoxy resin, we will be using a low-viscosity epoxy that consists of two components: resin A and hardener B. This particular epoxy is crystal clear. To begin, we will pour 8 ounces of resin A into the stainless steel mixing bowl, followed by an equal amount of hardener B. Once the bottles are emptied, we will use a spatula to premix the epoxy, ensuring that all the epoxy on the walls of the bowl is properly mixed. We will be using about 16 ounces of the clear epoxy for this demonstration, and it should flow easily. This is important for casting as it allows for the capture of small details.
Vacuum Mixing Steps
To begin the vacuum mixing process, we will follow these steps:
- Place the mixing bowl on the lift stand and lock it in place.
Install the mixer blade. - Lift the mixing bowl by turning the handle counterclockwise and sealing it against the lid.
- Activate the vacuum pump and valves to pump down the vacuum chamber.
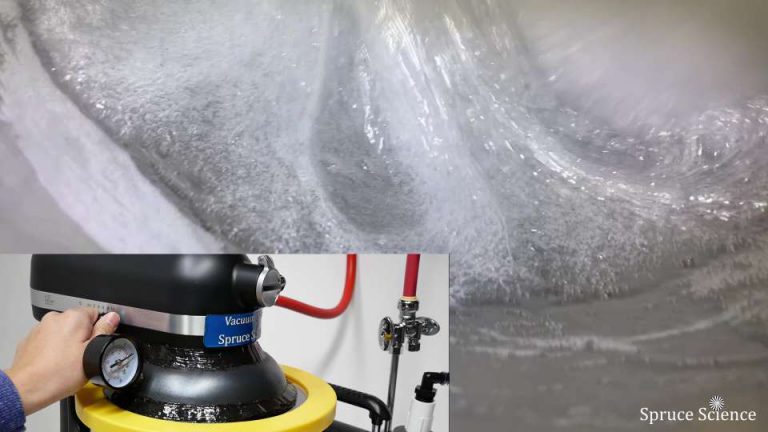
Monitor the pressure using the analog gauge. As the pressure decreases, the bubbles inside the epoxy will expand until they pop and the trapped air is removed by the running vacuum pump. At this point, the vacuum pump acts as a degassing chamber. - Turn on the mixer and adjust the speed to begin the vacuum mixing process, which will mix the materials thoroughly under low pressure in planetary motion. In this demonstration, we will mix the epoxy for 5 minutes, but the time can be adjusted to achieve the desired results.
Once the epoxy is sufficiently mixed, turn off the mixer by setting the control knob to 0. - Turn off the vacuum pump and valves.
- Vent the chamber by turning on the vent valve.
The clear epoxy is now mixed and ready for use.
Resin Casting
We will pour the mixed epoxy into various samples using plastic containers and silicone molds. It is important to secure the samples in place, as the epoxy is viscous enough to move them around if they are not held in place. The first sample is a California Lilac flower, which we will secure with tape. The second sample is a pine cone, which is light and prone to movement during the pouring process. The final samples are children’s toys made with a silicone mold, which is a good choice for epoxy casting as the epoxy does not adhere to silicone. We will pour epoxy mixed with the vacuum mixer, which is free of air, and compare it to epoxy mixed by hand in air, which contains air bubbles. We will let the samples cure overnight.
Results
After the samples were fully cured, we removed them from the containers and molds. The samples came out transparent and of high quality. However, the epoxy casting did change the color of the California Lilac flower. When we compared the samples mixed in air to those mixed with the vacuum mixer, we noticed that the vacuum mixer was effective in preventing the formation of air bubbles. The vacuum mixed samples were clear, while the ones mixed in air had a significant number of bubbles. Overall, the vacuum mixer is a valuable tool for mixing materials in a container that is free of air, as it eliminates bubbles and produces consistent results by avoiding unwanted secondary reactions with atmospheric gases.

Video Demonstration